
Renovation projects require planning, accuracy, and an understanding of how materials interact within existing structures. Walls form the foundation of any interior design, influencing not just appearance but also insulation, acoustics, and durability.
Strategic dry-wall installation for renovations and refurbs ensures that new surfaces integrate seamlessly with older frameworks while meeting modern standards for performance and finish. This process, when managed by skilled professionals, transforms outdated spaces into functional, visually consistent environments.
Techniques such as the correct use of lime plaster and modern plasterboard systems demonstrate how traditional craftsmanship and contemporary technology can work together effectively.
The Importance of Strategy in Dry-Wall Installation
Strategic planning defines the success of every refurbishment. Dry-wall systems must align with architectural requirements, spatial limitations, and intended design outcomes.
Coordinating with Renovation Goals
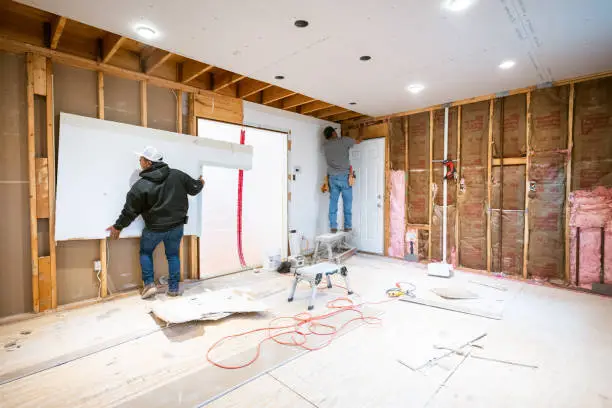
Every renovation project carries unique challenges. Older buildings often feature uneven surfaces, aged materials, and inconsistent framing. Strategic installation starts with a thorough site inspection, identifying weaknesses that might affect wall alignment or joint stability. The installer then develops a plan to correct structural discrepancies and prepare the space for new plasterboard systems.
Compatibility with Existing Structures
Dry-wall systems must bond securely to existing walls or frames without causing undue stress. In heritage renovations, compatibility between old materials and new products becomes essential. Traditional methods, such as the integration of lime plaster, support breathability and moisture control, preventing damage to aged substrates while maintaining historical integrity.
Efficient Scheduling and Sequencing
Renovations typically involve multiple trades working in limited timeframes. Strategic planning ensures that dry-wall installation fits smoothly within broader construction schedules. Coordinating with electricians, plumbers, and finishers prevents delays and reduces the risk of rework.
Choosing the Right Materials
Selecting suitable materials ensures strength, longevity, and aesthetic consistency across renovated spaces.
Plasterboard Selection
Different environments require different types of plasterboard. Moisture-resistant boards suit kitchens and bathrooms, while acoustic panels improve sound control in offices or apartments. Fire-rated boards enhance safety in commercial or multi-storey buildings. The correct choice depends on the space’s purpose, environmental conditions, and expected traffic levels.
Framing and Support Systems
Metal and timber frames provide the structure for dry-wall systems. Steel framing offers superior strength and resistance to movement, while timber provides flexibility for smaller residential projects. The choice of framing affects wall stability and the ability to integrate fixtures or insulation within cavities.
Finishing Compounds
Jointing compounds and adhesives ensure a seamless transition between boards. These materials must match the substrate type and drying requirements of the project. Applying multiple thin layers allows for greater precision and smoother finishes once painted or coated.
Preparation and Site Evaluation
Before installation begins, preparation determines the efficiency and quality of the final result.
Assessing Structural Stability
Older walls may reveal cracks, uneven foundations, or signs of moisture. Structural movement must be stabilised before new plasterboard is attached. In some cases, a base layer of breathable plaster such as lime plaster can provide additional reinforcement while preserving the natural movement of masonry structures.
Surface Cleaning and Levelling
Dust, loose paint, and debris can prevent adhesion. Cleaning the area thoroughly and using levelling compounds where necessary provides an even foundation for dry-wall systems. Proper preparation also ensures consistent alignment when joining new panels to existing surfaces.
Moisture and Ventilation Control
Renovations often uncover issues related to dampness. Addressing ventilation and moisture control before installation prevents long-term damage such as mould or bubbling paint. Moisture-resistant boards or breathable finishes are chosen according to the environmental conditions of each room.
Installation Techniques for Efficiency and Quality
The installation process combines technical precision with practical efficiency.
Accurate Measurement and Cutting
Each board must be measured and cut to exact dimensions. Precision ensures tight joins, minimal waste, and consistent coverage across surfaces. Tools such as T-squares and laser levels assist in maintaining straight lines, while care during cutting prevents frayed edges or material wastage.
Fixing and Joint Alignment
Boards are attached using screws or adhesives depending on the substrate. Consistent spacing prevents future movement or surface cracking. When fitting multiple sheets, careful alignment of joints ensures that seams fall between framing members, maintaining stability and reducing stress on edges.
Sealing and Finishing
Joint tape and compound are applied to all seams and corners. Each layer must dry fully before sanding and applying the next. This multi-step process produces a flawless surface suitable for painting, wallpapering, or textured finishes. Proper lighting during this stage helps identify imperfections that may not be visible under normal conditions.
Integration with Other Renovation Elements
Dry-wall installation forms part of a larger renovation framework that includes lighting, insulation, and decorative finishes.
Coordination with Electrical and Plumbing Work
Wiring, pipes, and fixtures are often concealed behind plasterboard. Close collaboration between trades ensures that openings and conduits are positioned accurately before panels are installed. Mistakes in this stage can lead to time-consuming adjustments later in the project.
Insulation and Acoustic Management
Dry-wall systems improve thermal and acoustic performance when combined with appropriate insulation. Materials such as mineral wool or foam panels within wall cavities help regulate indoor temperature and reduce sound transmission between rooms. Strategic installation ensures these materials remain secure and effective.
Integration with Ceiling and Floor Systems
Aligning dry-wall installation with ceiling and floor levels preserves visual consistency. Transition points must be measured precisely to avoid gaps or uneven joints. Cornices, skirting boards, and trims complete the transition while reinforcing structural connections.
Finishing Techniques for Professional Results
The finishing stage determines how the final surface appears under lighting and decoration.
Surface Smoothing and Sanding
After jointing compounds dry, sanding removes roughness and high spots. A smooth surface ensures uniform paint application and prevents visible seams. Professionals use fine-grade abrasives and dust extraction tools to maintain air quality and precision.
Priming and Painting
Primers seal the surface and prepare it for decorative coatings. Applying primer evenly ensures consistent paint absorption, avoiding patchiness. High-quality paints or textures highlight the craftsmanship of the plasterboard finish, transforming the wall into a defining feature of the renovated space.
Decorative Enhancements
Some projects incorporate decorative plaster features such as niches, curved walls, or shadow-line ceilings. Achieving these effects requires precise cutting and framing techniques. Modern dry-wall systems can accommodate complex shapes while maintaining strength and smoothness.
Challenges in Renovation Dry-Wall Work
Renovation environments differ significantly from new construction. Unexpected obstacles often appear during preparation or installation.
Hidden Structural Defects
Old plaster or framing may conceal damage that only becomes visible during demolition. Professional installers anticipate these challenges, using reinforcement mesh or backing systems to restore integrity before applying new boards.
Limited Access and Uneven Surfaces
Tight spaces or irregular wall shapes can make installation difficult. Custom cutting and flexible framing solutions allow plasterboard to fit smoothly even in confined areas. Proper planning ensures each board is manoeuvred without damage or distortion.
Dust and Environmental Management
Renovation work generates dust that can affect air quality. Modern sanding and cutting equipment includes extraction systems to minimise airborne particles. Protective coverings and ventilation strategies keep surrounding areas clean throughout the process.
Benefits of Strategic Dry-Wall Installation
When executed with care, strategic installation brings lasting improvements to both functionality and appearance.
Improved Energy Efficiency
Properly sealed and insulated dry-wall systems enhance energy performance. They prevent heat loss in winter and maintain cooler interiors during summer. This efficiency contributes to long-term cost savings and improved comfort.
Aesthetic Flexibility
Dry-wall provides a smooth canvas for paint, wallpaper, or decorative finishes. The ability to shape and contour plasterboard allows for creative architectural features such as alcoves, lighting recesses, and bulkheads.
Structural Longevity
Accurate installation reduces stress on framing and joints. When maintained properly, dry-wall surfaces remain strong and stable for decades, supporting both durability and safety.
Faster Construction and Lower Maintenance
Compared with traditional plastering methods, dry-wall systems cure quickly and require minimal upkeep. This speed benefits renovation projects with tight deadlines, allowing other trades to proceed without delay.
Sustainability and Environmental Performance
Modern dry-wall systems contribute to environmentally responsible building practices.
Recyclable Materials
Plasterboard contains gypsum, a recyclable mineral that can be reused in new boards. Responsible disposal and recycling programs reduce waste and environmental impact.
Energy-Efficient Manufacturing
Advances in production have lowered energy use in plasterboard manufacturing. Combining recycled paper liners and natural gypsum improves sustainability without reducing quality.
Healthy Indoor Air
Low-VOC adhesives and compounds improve indoor air quality. Breathable finishes such as lime plaster also regulate humidity, preventing mould growth and supporting a healthier living environment.
Frequently Asked Questions
How long does dry-wall installation take during a renovation?
The timeframe depends on project size and complexity. Generally, installation can be completed within a few days, though preparation, jointing, and finishing may extend the overall schedule.
Can dry-wall be used in heritage buildings?
Yes. With proper preparation and compatible materials, dry-wall can complement heritage structures. Combining it with traditional finishes such as lime plaster maintains authenticity while improving strength.
How does dry-wall improve energy efficiency?
When installed strategically with insulation and proper sealing, dry-wall reduces heat transfer and air leakage. This contributes to stable indoor temperatures and lower energy consumption.
Conclusion
Strategic dry-wall installation for renovations and refurbs represents a balance between craftsmanship, planning, and material expertise. By integrating modern plasterboard systems with traditional methods such as lime plaster, professionals achieve results that are both durable and visually refined.
Each stage—from preparation to finishing—requires accuracy and coordination to ensure long-lasting quality. Through careful execution and attention to environmental performance, strategic dry-wall installation continues to shape renovations that respect the past while meeting the demands of modern living.